Saturday, January 12, 2013

Hemming jeans with the original seam

I can almost never find a pair of jeans that fit my height, eh. I seen this tutorial online before but wanted to make my own. If your framiliar with a sewing machine it is so easy.
So heres the jeans before..

 
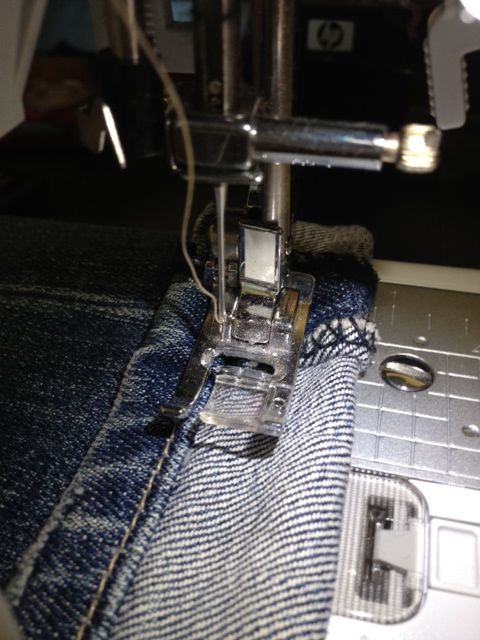
Next your gunna want to fold them upwards as if your cuffing the bottoms. Then pin all the way around the leg.
 
after measuring the length you want off and folding and pinning your gunna want to start sewing around the pant leg, make sure you dont sew the two pant legs together though. sew along the hem line as closely as possible.

 
After sewing around all sides it should look like this
 

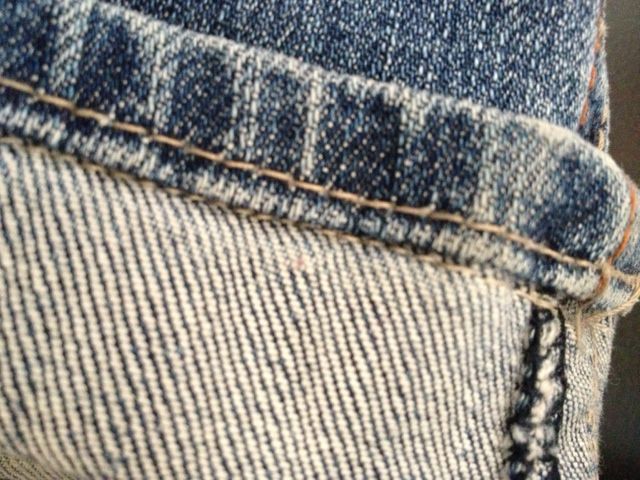
See the top brown colored stitch is the original and mine is the smaller brown one on the bottom. Next you can cut the excess if you want I did because It felt kind of bulky on the bottoms with the excess jean material

 
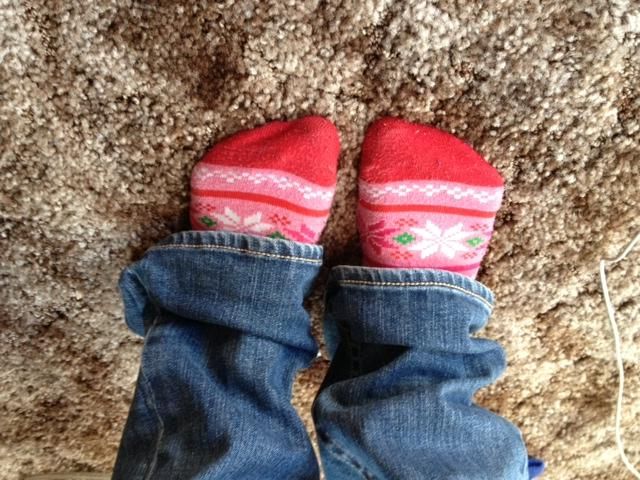
Taaaa daaaaa! Yay for being short.

 
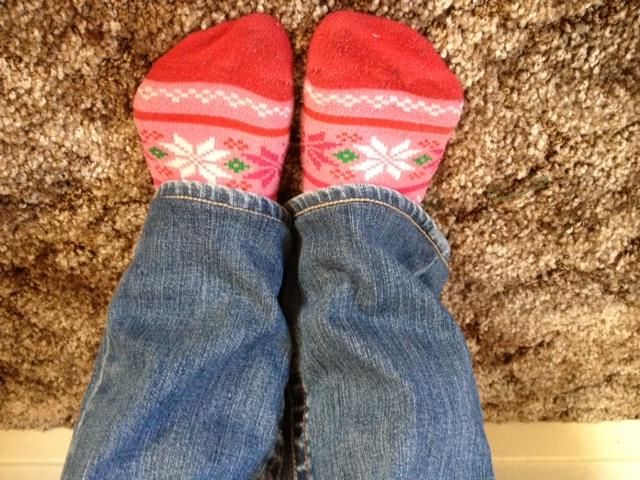
Oh and excuse my lovely christmas socks. Grandmas always give the best gifts.


Tuesday, January 8, 2013

ugly pillow cover up

So I found these hideous pillows in my basement and thought they needed a makeover so I made a tutorial for (super) EASY pillow covers.
Youll need a sewing machine, fabric and a pillow to cover.
 
Step 1: To get the size youll want to lay a piece of fabric down and then lay the pillow on top cut down the side and then flip the pillow so its doubled and keep cutting untill the size is twice the size of the pillow.
 
Step 2: Grab one short side of the fabric and fold it over a few centimeters and start sewing. I used a heart stitch you could really use anyone you choose
 
Step 3: Sew down both sides of the short ends leaving a third of a inch or so at the end
 
Step 4: Your gunna want to lay your fabric out Print side up then fold each end into eachother like shown.


Step 5: Showing how you want it folded to begin to sew
 
Step 6: Sew a straight line all the way down both of the sides that have not been sewn yet (the top and bottom of the pillow case)
 
Step 7: Trim all excess fabric around the sewn edges
 
Step 8: Turn inside out and insert pillow


Tuesday, December 18, 2012

simple canvas

I have tons of scrap fabric and Ive seen other things on pinterest like this one by making a canvas of your own. I used the top of a shoe box and covered it with a felt-like fabric.

 
Then added a few pictures..
 
And hung it up in my sons room :)


Saturday, December 15, 2012

sweater sleeves to leg warmers

 
I was looking in the "church clothes" section of my closet (which I never use by the way)
and I came across this brown crocheted sweater which I will NEVER wear. Just not my style.
so I thought LEG WARMERS. I cut off the sleves and used fabric sissors to do so, much more even cut and wil prevent "fabric rolling."
So After cutting the sleeves off I also cut off the buttons down the front. There were 4.
I measured the warmers accordingly then slit a line down where it would lie on the side of your leg. Dont know if that makes sence but you know what I mean .....
I then hand sewed two buttons vertical  to one another on the left side of the slit. Do so for each one, then cut two tiny slits on the opposite side for the button to slide through.


           not bad not bad. and theyll keep my legs warm in this freezing weather. Ill deff. be making another, better, pair of these soon!


Saturday, November 24, 2012

Chicken and biscuit bake


This is the second time ive made this and it is so so good. and so easy to shred for my toddler to eat! :)

Recipe:
-Biscuits (I used sara lee bagged ones but you could use home made)
-Cream of chicken soup
-Chicken
-A crockpot

Its so simple I just seasoned my chicken in the crockpot cooked it on high for two hours then took it out and layed it into a pan. Then, pour the cream of chicken soup on top of each piece of chicken and place biscuits inbetween. Put into the oven at 350 degrees for about 15 minutes. Enjoy.

Sunday, November 4, 2012

DIY christmas project

So I've been thinking of a very simple chrismas craft for me and my one and a half year old to do. Something not too messy, not too complicated, or not something that would take a long time due to him barely being able to sit in one place for longer than 3 minutes. HA.
I went into michaels and was looking at christmas stuff and seen these blank ornaments marked at 1.69 a piece but were on sale for 50% off. um, score. I only bought one because I wanted to make sure this wouldnt be a big fail. I poured some red paint onto a plate and used a sponge brush and painted it onto my sons hand. While holding the other one down and trying to keep it from his mouth.. I then handed him the ornament and he grabbed it like he would grabbed a ball so the handprint went on perfectly! Add some glitter with glue and write whatever you desire on the back. Theres so many ideas that can be done with this simple glass ornament. Cant wait for christmas!


Saturday, October 13, 2012

turning the back of a shirt to lace

So my mother in law let me borrow her sewing machine and I need to share this expierence, and if you are a sewer youll completely understand. So she brought me her sewing machine and threaded it for me and everything, didnt show me how to threat both needles just did it for me. Showed me some stitches on a practice piece of scrap. You know basic sewing stuff. So then she left and im attempting to sew on my own...bobbin keeps falling out all the strings kept getting tangeled ive been working with this sewing machine for 3 days now and have STILL not accomplished any sewing project. I even replaced the needle. So anyway, I ended up HAND sewing this because I already bought the material and I wasnt gunna let it get wasted by this worthless sewing machine that was NOT being compliant with me. Heres a short tutorial on how I did this one
First I cut the back of the shirt off like this.
 so only the front of the shirt is left to work with. I then laid the lace material (got at walmart for 4.99 a yard but I only used a half a yard or less) behind the backing of the shirt that I cut off and SAVED..
that is the back part of the shirt ^
Then I cut the lace around kinda like tracing it.
I sewed the "back lace" onto the front and sewed it like it would be inside out and then trimmed all the string up at the end flipped it right side out and wa laaaaa..